
MCP server for controlling and accessing a video surveillance system
{
  "vms": {
    "command": "uv",
    "args": [
      "--directory",
      "X:\\path\\to\\mcp-vms",
      "run",
      "mcp_vms.py"
    ],
    "env": {}
  }
}
MCP Server - VMS Integration
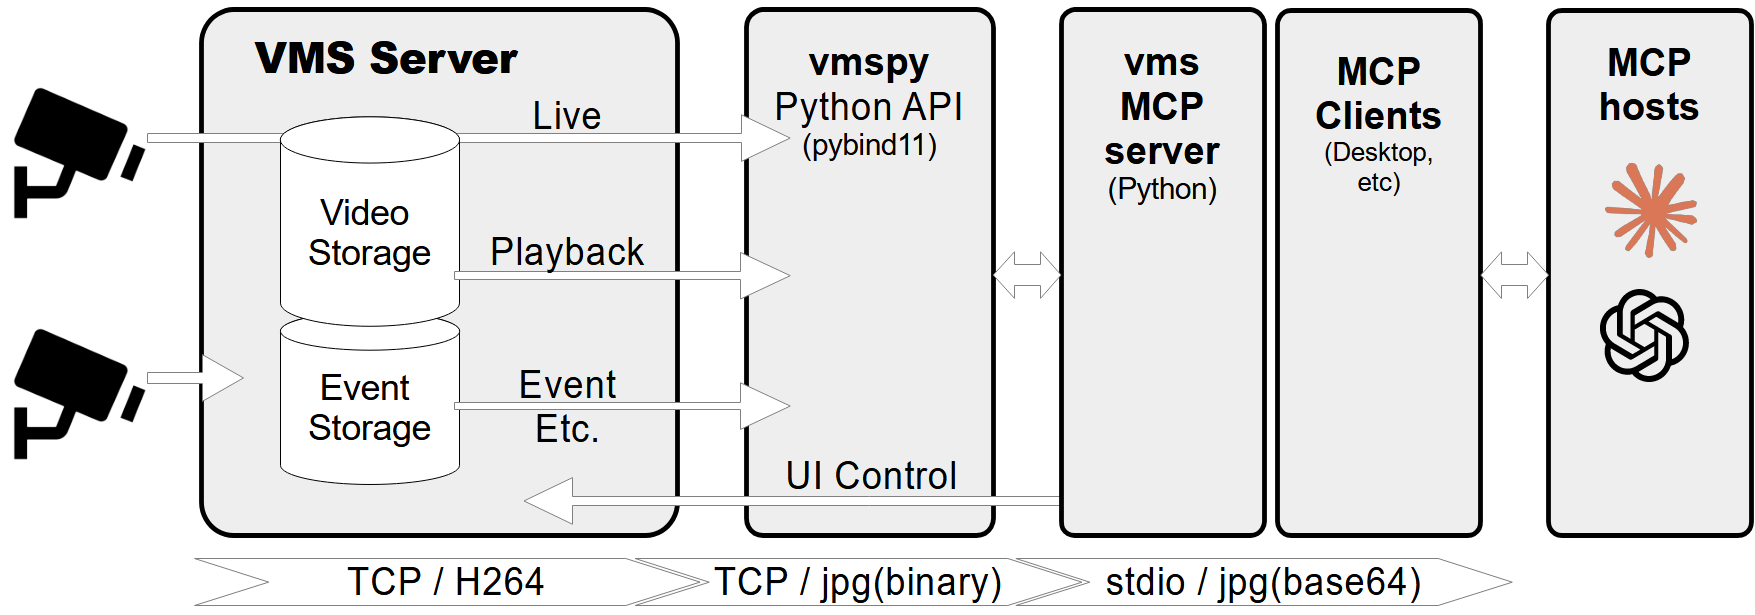
A Model Context Protocol (MCP) server designed to connect to a CCTV recording program (VMS) to retrieve recorded and live video streams. It also provides tools to control the VMS software, such as showing live or playback dialogs for specific channels at specified times.
Features
- Retrieve video channel information, including connection and recording status.
- Fetch recording dates and times for specific channels.
- Fetch live or recorded images from video channels.
- Show live video streams or playback dialogs for specific channels and timestamps.
- Control PTZ (Pan-Tilt-Zoom) cameras by moving them to preset positions.
- Comprehensive error handling and logging.
Prerequisites
- Python 3.12+
vmspylibrary (for VMS integration)Pillowlibrary (for image processing)
MCP-server Configuration
If you want to use mcp-vms with Claude desktop, you need to set up the claude_desktop_config.json file as follows:
{
  "mcpServers": {
	"vms": {
	  "command": "uv",
	  "args": [
		"--directory",
		"X:\\path\\to\\mcp-vms",
		"run",
		"mcp_vms.py"
	  ]
	}
  }
}
VMS Connection Configuration
The server uses the following default configuration for connecting to the VMS:
- mcp_vms_config.py
vms_config = {
    'img_width': 320,
    'img_height': 240,
    'pixel_format': 'RGB',
    'url': '127.0.0.1',
    'port': 3300,
    'access_id': 'admin',
    'access_pw': 'admin',
}
Installation
1. Install UV Package Manager
Run the following command in PowerShell to install UV:
powershell -ExecutionPolicy ByPass -c "irm https://astral.sh/uv/install.ps1 | iex"
For alternative installation methods, see the official UV documentation.
2.Install VMS Server
Download and install the VMS server from:
http://surveillance-logic.com/en/download.html
(Required before using this MCP server)
3.Install Python Dependencies
Download the vmspy library:
vmspy1.4-python3.12-x64.zip
Extract the contents into your mcp_vms directory
The mcp-vms directory should look like this:
mcp-vms/
├── .gitignore
├── .python-version
├── LICENSE
├── README.md
├── pyproject.toml
├── uv.lock
├── mcp_vms.py            # Main server implementation
├── mcp_vms_config.py     # VMS connection configuration
├── vmspy.pyd             # VMS Python library
├── avcodec-61.dll        # FFmpeg libraries
├── avutil-59.dll
├── swresample-5.dll
├── swscale-8.dll

MCP Server - VMS Integration
A Model Context Protocol (MCP) server designed to connect to a CCTV recording program (VMS) to retrieve recorded and live video streams. It also provides tools to control the VMS software, such as showing live or playback dialogs for specific channels at specified times.
Features
- Retrieve video channel information, including connection and recording status.
- Fetch recording dates and times for specific channels.
- Fetch live or recorded images from video channels.
- Show live video streams or playback dialogs for specific channels and timestamps.
- Control PTZ (Pan-Tilt-Zoom) cameras by moving them to preset positions.
- Comprehensive error handling and logging.
Prerequisites
- Python 3.12+
vmspylibrary (for VMS integration)Pillowlibrary (for image processing)
MCP-server Configuration
If you want to use mcp-vms with Claude desktop, you need to set up the claude_desktop_config.json file as follows:
{
  "mcpServers": {
	"vms": {
	  "command": "uv",
	  "args": [
		"--directory",
		"X:\\path\\to\\mcp-vms",
		"run",
		"mcp_vms.py"
	  ]
	}
  }
}
VMS Connection Configuration
The server uses the following default configuration for connecting to the VMS:
- mcp_vms_config.py
vms_config = {
    'img_width': 320,
    'img_height': 240,
    'pixel_format': 'RGB',
    'url': '127.0.0.1',
    'port': 3300,
    'access_id': 'admin',
    'access_pw': 'admin',
}
Installation
1. Install UV Package Manager
Run the following command in PowerShell to install UV:
powershell -ExecutionPolicy ByPass -c "irm https://astral.sh/uv/install.ps1 | iex"
For alternative installation methods, see the official UV documentation.
2.Install VMS Server
Download and install the VMS server from:
http://surveillance-logic.com/en/download.html
(Required before using this MCP server)
3.Install Python Dependencies
Download the vmspy library:
vmspy1.4-python3.12-x64.zip
Extract the contents into your mcp_vms directory
The mcp-vms directory should look like this:
mcp-vms/
├── .gitignore
├── .python-version
├── LICENSE
├── README.md
├── pyproject.toml
├── uv.lock
├── mcp_vms.py            # Main server implementation
├── mcp_vms_config.py     # VMS connection configuration
├── vmspy.pyd             # VMS Python library
├── avcodec-61.dll        # FFmpeg libraries
├── avutil-59.dll
├── swresample-5.dll
├── swscale-8.dll
Related MCP Servers
ida-pro-mcp
MCP Server for IDA Pro.
beelzebub
A secure low code honeypot framework, leveraging AI for System Virtualization.
vet
Protect against malicious open source packages 🤖
jadx-ai-mcp
Plugin for JADX to integrate MCP server
apktool-mcp-server
A MCP Server for APK Tool (Part of Android Reverse Engineering MCP Suites)
mcp-maigret
MCP server for maigret, a powerful OSINT tool that collects user account information from various public sources.